Grafici VBA di Excel
I grafici possono essere definiti come oggetti in VBA, in modo simile al foglio di lavoro possiamo anche inserire grafici in VBA nello stesso modo, prima selezioniamo i dati e il tipo di grafico che vogliamo per i dati, ora ci sono due diversi tipi di grafici che forniamo uno è il grafico incorporato in cui il grafico si trova nello stesso foglio di dati e un altro è noto come foglio grafico in cui il grafico è nel foglio separato dei dati.
Nell'analisi dei dati, gli effetti visivi sono gli indicatori chiave di prestazione della persona che ha effettuato l'analisi. Le immagini sono il miglior modo possibile in cui un analista può trasmettere il proprio messaggio. Dato che siamo tutti utenti Excel, di solito dedichiamo molto tempo all'analisi dei dati e traiamo conclusioni con numeri e grafici. Creare un grafico è un'arte da padroneggiare e spero che tu abbia una buona conoscenza della creazione di grafici con Excel. In questo articolo, ti mostreremo come creare grafici utilizzando la codifica VBA.

Come aggiungere grafici utilizzando il codice VBA in Excel?
# 1 - Crea un grafico utilizzando la codifica VBA
Per creare un grafico, dovremmo avere una sorta di dati numerici. Per questo esempio, userò i dati di esempio di seguito.

Ok, passiamo all'editor VBA.
Passaggio 1: avviare la procedura secondaria.
Codice:
Sub Charts_Example1 () End Sub

Passaggio 2: definire la variabile come Grafico.
Codice:
Sub Charts_Example1 () Dim MyChart As Chart End Sub

Passaggio 3: poiché il grafico è una variabile oggetto, è necessario impostarlo .
Codice:
Sub Charts_Example1 () Dim MyChart As Chart Set MyChart = Charts.Add End Sub

Il codice sopra aggiungerà un nuovo foglio come foglio grafico, non come foglio di lavoro.

Passaggio 4: ora dobbiamo progettare il grafico. Apri con istruzione.
Codice:
Sub Charts_Example1 () Dim MyChart As Chart Set MyChart = Charts.Aggiungi con MyChart End With End Sub

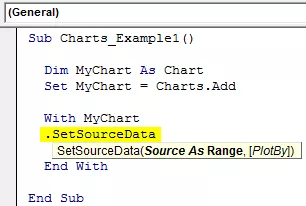
Passaggio 5: La prima cosa da fare con il grafico è impostare l'intervallo di origine selezionando il metodo "Imposta dati di origine" .
Codice:
Sub Charts_Example1 () Dim MyChart As Chart Set MyChart = Charts.Add With MyChart .SetSourceData End With End Sub
Passaggio 6: qui, dobbiamo menzionare l'intervallo di origine. In questo caso, il mio intervallo di origine si trova nel foglio denominato "Foglio1" e l'intervallo è "da A1 a B7".
Codice:
Sub Charts_Example1 () Dim MyChart As Chart Set MyChart = Charts.Add With MyChart .SetSourceData Sheets ("Sheet1"). Range ("A1: B7") End With End Sub

Passaggio 7: Successivamente, dobbiamo selezionare il tipo di grafico che creeremo. Per questo, dobbiamo selezionare la proprietà Tipo di grafico .
Codice:
Sub Charts_Example1 () Dim MyChart As Chart Set MyChart = Charts.Add With MyChart .SetSourceData Sheets ("Sheet1"). Range ("A1: B7") .ChartType = End With End Sub
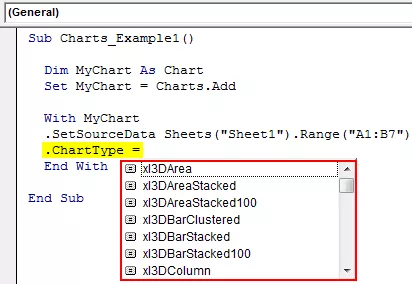
Passaggio 8: qui abbiamo una varietà di grafici. Selezionerò il grafico " xlColumnClustered ".
Codice:
Sub Charts_Example1 () Dim MyChart As Chart Set MyChart = Charts.Add With MyChart .SetSourceData Sheets ("Sheet1"). Range ("A1: B7") .ChartType = xlColumnClustered End With End Sub

Ok, in questo momento, eseguiamo il codice usando il tasto F5 o manualmente e vediamo come appare il grafico.

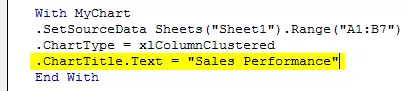
Passaggio 9: ora, modifica altre proprietà del grafico. Per modificare il titolo del grafico, di seguito è riportato il codice.
In questo modo, abbiamo molte proprietà e metodi con i grafici. Usa ognuno di loro per vedere l'impatto e imparare.
Sub Charts_Example1 () Dim MyChart As Chart Set MyChart = Charts.Add With MyChart .SetSourceData Sheets ("Sheet1"). Range ("A1: B7") .ChartType = xlColumnClustered .ChartTitle.Text = "Performance di vendita" End With End Sub
# 2 - Crea un grafico con lo stesso foglio Excel della forma
To create the chart with the same worksheet (datasheet) as shape, we need to use a different technique.
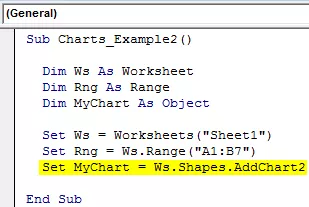
Step 1: First Declare threes Object Variables.
Code:
Sub Charts_Example2() Dim Ws As Worksheet Dim Rng As Range Dim MyChart As Object End Sub

Step 2: Then Set the Worksheet reference.
Code:
Sub Charts_Example2() Dim Ws As Worksheet Dim Rng As Range Dim MyChart As Object Set Ws = Worksheets("Sheet1") End Sub

Step 3: Now set the range object in VBA
Code:
Sub Charts_Example2() Dim Ws As Worksheet Dim Rng As Range Dim MyChart As Object Set Ws = Worksheets("Sheet1") Set Rng = Ws.Range("A1:B7") End Sub

Step 4: Now, set the chart object.
Code:
Sub Charts_Example2() Dim Ws As Worksheet Dim Rng As Range Dim MyChart As Object Set Ws = Worksheets("Sheet1") Set Rng = Ws.Range("A1:B7") Set MyChart = Ws.Shapes.AddChart2 End Sub
Step 5: Now, as usual, we can design the chart by using the “With” statement.

Code:
Sub Charts_Example2() Dim Ws As Worksheet 'To Hold Worksheet Reference Dim Rng As Range 'To Hold Range Reference in the Worksheet Dim MyChart As Object Set Ws = Worksheets("Sheet1") 'Now variable "Ws" is equal to the sheet "Sheet1" Set Rng = Ws.Range("A1:B7") 'Now variable "Rng" holds the range A1 to B7 in the sheet "Sheet1" Set MyChart = Ws.Shapes.AddChart2 'Chart will be added as Shape in the same worksheet With MyChart.Chart .SetSourceData Rng 'Since we already set the range of cells to be used for chart we have use RNG object here .ChartType = xlColumnClustered .ChartTitle.Text = "Sales Performance" End With End Sub
This will add the chart below.

#3 - Code to Loop through the Charts
Like how we look through sheets to change the name or insert values, hide & unhide them. Similarly, to loop through the charts, we need to use chart object property.
The below code will loop through all the charts in the worksheet.
Code:
Sub Chart_Loop() Dim MyChart As ChartObject For Each MyChart In ActiveSheet.ChartObjects 'Enter the code here Next MyChart End Sub
#4 - Alternative Method to Create Chart
We can use the below alternative method to create charts. We can use the Chart Object. Add method to create the chart below is the example code.
This will also create a chart like the previous method.
Code:
Sub Charts_Example3 () Dim Ws As Worksheet Dim Rng As Range Dim MyChart As ChartObject Set Ws = Worksheets ("Sheet1") Set Rng = Ws.Range ("A1: B7") Set MyChart = Ws.ChartObjects.Add (Left: = ActiveCell.Left, Larghezza: = 400, Superiore: = ActiveCell.Top, Altezza: = 200) MyChart.Chart.SetSourceData Origine: = Rng MyChart.Chart.ChartType = xlColumnStacked MyChart.Chart.ChartTitle.Text = "Performance di vendita" Fine Sub


